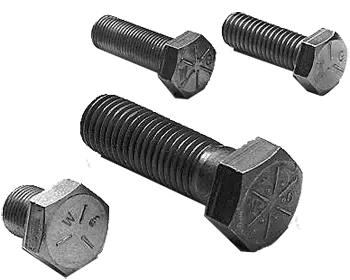
If you’ve ever spent time looking at different screw and bolt heads, you’ve probably noticed that there are a wide variety of markings that are stamped on them. The markings can be numbers, letters, slashes, dots, or an assortment of other marks.
If you’ve ever wondered what those screw and bolt head markings mean, or if there’s some overarching logic to them, you’re in the right place. In this article, we’ll give you an overview of the following:
Manufacturer Screw and Bolt Head Markings
Fastener Standard Screw and Bolt Head Markings
Examples of Screw and Bolt Head Markings & What They Mean
What Do Screw and Bolt Head Markings Mean?
Screw and bolt head markings identify the manufacturer of the fastener and the standard to which the fastener was made. Below, we’ll explore both of those concepts, then connect them together with a few examples.
Manufacturer Screw and Bolt Head Markings
The Fastener Quality Act mandates that manufacturers must mark each fastener with their unique company symbol to identify that they made it — the only exception being fasteners that are too small to mark. Every company that has registered its specific screw and bolt head marking can be found in this document. Simply click the little PDF symbol next to the latest version, and you’ll be able to view the list for free.
Because each fastener is uniquely marked by its maker, the part can be easily traced back to its manufacturer should a problem occur. This traceability serves to instill a sense of accountability in the manufacturer and a sense of confidence in the end user.
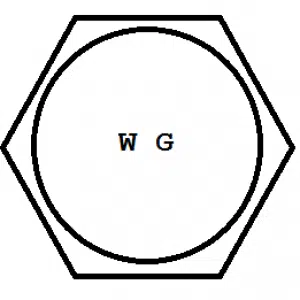
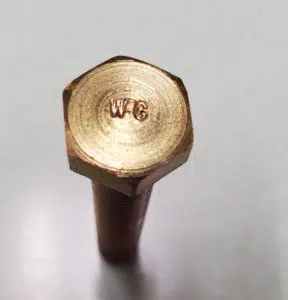
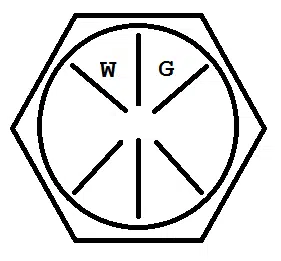
As an example of a manufacturer screw and bolt head marking, the unique identifier for us at Wilson-Garner is the letter combination WG. Appearing on the head of a bolt or screw, it would look something like the image to the right.
Fastener Standard Screw and Bolt Head Markings
Over the years, different organizations have come together and attempted to bring some order to the fastener industry by releasing standards that provide specifications for certain types of fasteners. These specs can cover anything from material composition, to dimensional tolerances, to plating. For example, the American Society of Mechanical Engineers (ASME) has a document called ASME B1.1 that provides requirements for unified inch screw threads.
There are all sorts of standards for all sorts of fasteners — ISO, IATF, SAE, ASTM, ASME, etc. How important is a particular standard? It depends on how many people decide that it’s important. Some, like ASME B1.1 mentioned above, are universally accepted and used. Others are a bit more obscure, or are intended to service a limited segment of the industry.
Interested in learning about some other fastener standards? Check out our blogs on ISO standards or bolt grades.
Some fastener standards create classes or grades for fasteners by laying out material and physical requirements that a fastener must meet. A common example is SAE J429, which lays out requirements for many common fastener grades, such as Grade 2, Grade 5, and Grade 8 — which all begin to work as some kind of shorthand terminology for fasteners. When you know a fastener is Grade 5, for instance, you automatically know many details about it, including things like:
- Materials it’s made out of
- Its hardness range
- Its strength characteristics
- If it’s an inch or metric part
How does this all relate to screw and bolt head markings? Well, most fastener standards that introduce classes and grades have screw and bolt head marking requirements. The class and grade identifiers combine with the manufacturer’s head marking to comprise the jumble of stuff you’ll find on most fastener heads.
Examples of Screw and Bolt Head Markings & What They Mean
Now let’s put all this information together. We’ll do so by returning back to SAE J429, a standard established by The Society of Automotive Engineers (SAE). In a nutshell, this standard lays out mechanical and material requirements for inch bolts, screws, studs, sems, and U-bolts in sizes up to 1-½” in diameter.
But the main thing to focus on here is that the standard introduces a grading system based on numbers, where increasing numbers indicate increasing strength — so a Grade 5 has a higher tensile strength than a Grade 2. And those grades are shown on the head markings of a bolt. While SAE J429 standard designates many grades, we’ll focus on three of the most commonly used below.
SAE J429 Grade 2 Bolt Head Marking
Our first example is a bolt head marking that looks like this:
Wait a minute! There’s no grade marking on this bolt! You just reused the image from before! Well, that’s true — we did just reuse the image from before, but we did it because Grade 2 bolts don’t have a head marking requirement.
So if there’s no head marking requirement, how can you know when a bolt is a Grade 2 and when it’s something else? The answer is: we don’t know. A lack of a grade identifier will tell you that a bolt ISN’t one of the myriad of other classes and grades — but in order to be sure of exactly what it IS, you’ll need to verify the material.
Once we’ve established the bolt is a Grade 2, you now know two important things. You know that the bolt is an inch-series bolt, and you know what its minimum tensile strength is — well, once you know the diameter of the bolt, that is. Here are some of the minimum tensile strengths for Grade 2 bolts, based on diameter:
- Diameters of ¼ – ¾” = minimum tensile strength of 74 ksi
- Diameters of ¾ – 1 ½” = minimum tensile strength of 60 ksi
Bolts with these tensile strengths would be considered low-strength bolts. These strengths can generally be achieved without heat treating the parts.
SAE J429 Grade 5 Bolt Head Marking
Our second example actually has a grade head marking:
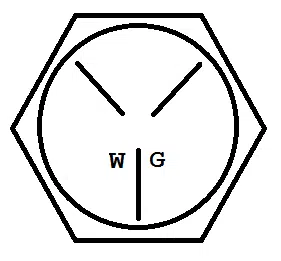
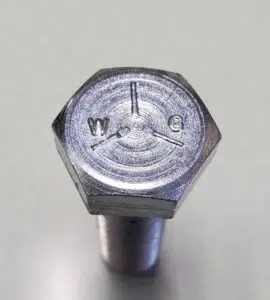
So, as you can see, this bolt head has Wilson-Garner’s manufacturer mark and three radial lines. These lines indicate that the bolt is a Grade 5. Here are some of the minimum tensile strengths for Grade 5 bolts, based on diameter:
- Diameters of ¼ – 1” = minimum tensile strength of 120 ksi
- Diameters of 1 – 1 ½” = minimum tensile strength of 105 ksi
Grade 5 bolts are considered to be medium-strength fasteners. They’re required to be heat-treated, quenched, and tempered in order to gain the desired strength.
SAE J429 Grade 8 Bolt Head Marking
Finally, our last example from SAE J429:
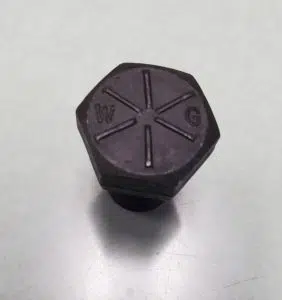
Here, we have a bolt head marking with the Wilson-Garner manufacturer identifier and six radial lines. These six radial lines indicate that the bolt is a Grade 8 bolt.
*Note: You may notice that in the images the WG identifier has been moved around a bit to accommodate the grade markings. This is a totally legitimate practice. Many times with smaller diameter fasteners, you’re trying to fit all the required markings on the head while keeping them legible — so you move things around to fit them as best as you can. For the SAE J429 standard, placement of the lines is important, so we move the WG around as necessary. For many other standards, you’re free to move all markings around as needed.
Back to Grade 8. Grade 8 bolts have a minimum tensile strength of 150 ksi for all diameters from ¼ – 1 ½”. They’re considered to be high–strength fasteners, and they need to be heat-treated, quenched, and tempered in order to reach the desired strength.
So there you have it — a quick overview of the key grades from SAE J429 and their head markings. As a quick summary:
- No marking – Grade 2
- Three radial lines – Grade 5
- Six radial lines – Grade 8
Learn More About Screw & Bolt Head Markings with Wilson-Garner
Interested in learning a bit more about screw and bolt head markings? We talk about three additional standards that deal with inch-series fasteners in this blog. Or, we also talk about some metric head markings in this blog. Check them out.
And if you have any questions that these blogs can’t answer for you, feel free to reach out to us. With plenty of experience in the fastener industry, we’ll likely have an answer for you. Give us a call at (800) 656-2658 or contact us online.


Comments are closed.